How to hide cables on a glass conference table is not merely a decorating question. It affects safety, maintenance, accessibility, and meeting quality. Steelcase’s Global Report found that 87% of employees wanted more choice in where and how they worked. Flexible technology therefore needs flexible cable planning. A glass tabletop exposes every careless loop, dark connector, and dusty adhesive clip. The detail is small, but the impression is immediate.
Don Norman, a leading design researcher, wrote, “Design is really an act of communication.” His principle applies here. A clean cable route communicates control, while a loose power lead suggests poor preparation. Begin by mapping each device, outlet, and user position. Then consider under-table cable trays, transparent raceways, recessed floor boxes, and vertical cable spines. Keep power and data lines separated where practical. Add slack beneath the table, but avoid hanging loops that touch knees or cleaning equipment. It sounds simple.
Industry guidance also supports planned infrastructure. BICSI standards emphasize organized pathways, proper separation, and service access in telecommunications installations. The WELL Building Standard encourages healthier, more functional work environments, including thoughtful technology integration. These references do not provide one universal solution. Glass thickness, table structure, floor access, and local electrical requirements change the answer. A perfect concealment may be the wrong choice if technicians cannot reach it. That is an uncomfortable point, but it matters. The best installation hides cables from view while keeping every connection identifiable, ventilated, and repairable. This guide examines practical methods, realistic limitations, and the mistakes that polished conference rooms often conceal.
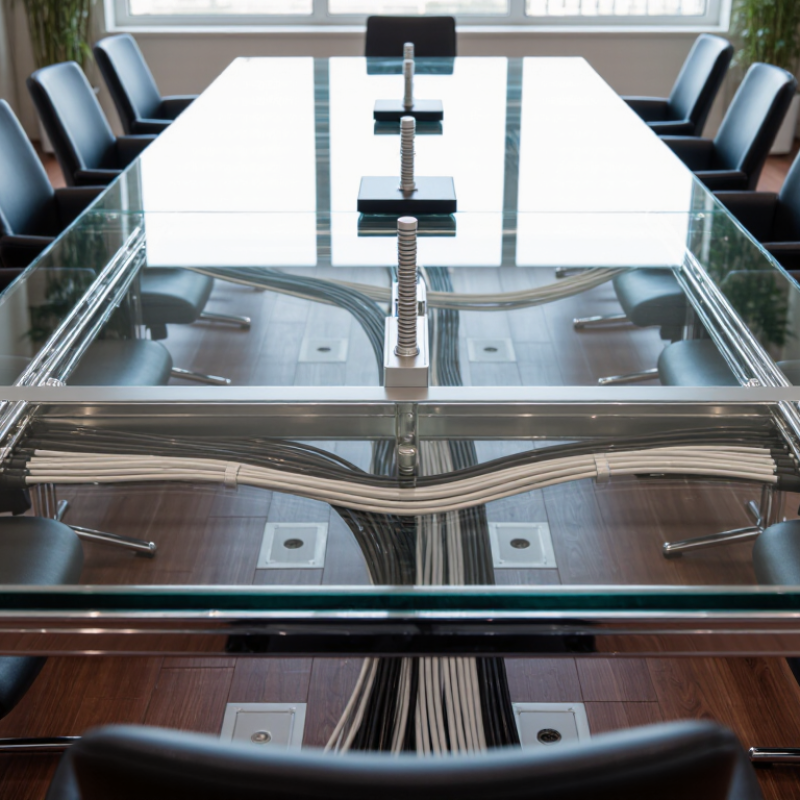
Before hiding cables, inspect the glass conference table carefully. Identify its thickness, glass type, edge shape, and support structure. Tempered glass can fail suddenly if drilled or struck near an edge. Avoid guessing.
Use a flashlight to locate existing fittings, metal brackets, and underside gaps. Measure the distance from each seat to the nearest power or data point. Record the number of cables, their lengths, connector sizes, and bend requirements.
Thick power cords need more space than slim signal cables. Heat also matters, especially when several adapters share one enclosed channel. Glass shows everything.
A practical layout keeps cables attached to the frame, not the glass surface. Choose removable, glass-compatible clips only after testing one in a hidden area. Check whether the adhesive leaves marks or loses grip after cleaning. A cardboard mock-up can reveal poor access before installation. I would also leave a small service loop beneath each connection. Too little slack makes maintenance frustrating. Too much creates visible clutter.
The first plan is rarely perfect. One cable may still cross an exposed corner. That is a useful warning. Recheck viewing angles from seated positions, standing positions, and the doorway. Keep heavy power blocks supported by the frame, and separate them from delicate data cables where possible. Never force a connector through a narrow gap. If the glass requires drilling or structural alteration, consult a qualified glass professional.
A glass conference table can look elegant, but loose cables quickly ruin that clean appearance. The safest approach is reversible and gentle. Avoid drilling, permanent glue, or pressure that could stress the glass. Instead, route cables along the table’s rear edge with removable clips or a soft cable sleeve. Test one clip in a hidden corner first. Some adhesives leave marks, even when labeled removable.
Keep power cables separate from data and display cables where practical. This reduces tangling and makes faults easier to trace. Use a low-profile floor cover for any cable crossing open walking space. Choose one with beveled edges and enough internal room. Never trap a power strip inside a tightly closed sleeve. Heat needs an escape route.
I usually label both ends before installation. It saves time during meetings. Leave a small service loop near each device, rather than pulling cables tight. Tight cables can shift equipment or strain connectors. Check that the glass remains stable and that no clip presses against an unsupported edge. I once placed a sleeve too close to a chair path; it looked neat, but shoes caught it. That mistake changed my layout. A safe design matters more than a perfectly hidden cable. Inspect the setup after moving chairs, screens, or microphones. Reversible work should remain easy to remove, inspect, and improve.
| Method | Best Use | Typical Cable Capacity | Installation Time | Reversibility | Glass Safety | Residue or Surface Risk | Practical Recommendation |
|---|---|---|---|---|---|---|---|
| Removable glass-safe cable clips | Routing thin charging, display, microphone, or network cables along the rear edge of the tabletop | 1–3 small cables per clip | 5–15 minutes | Excellent | Low risk when the clips are specifically rated for smooth glass | Low when removed slowly according to the product instructions; test one hidden location first | Best overall choice for light cables and a clean tabletop appearance |
| Clear suction-cup cable holders | Temporary routing on smooth, clean glass where frequent repositioning is needed | 1–2 light cables per holder | 5–10 minutes | Excellent | Very low, because no adhesive or drilling is required | Usually none; performance can decline with dust, condensation, textured glass, or uneven surfaces | Useful for short-term setups, but not suitable for heavy cable bundles or tensioned cables |
| Non-adhesive under-table cable tray | Collecting power strips, adapters, and several cables beneath the table | Approximately 5–10 standard cables, depending on tray size | 15–30 minutes | Good | Safe when supported by existing table structure rather than bonded to the glass | Low; avoid any model that requires drilling, permanent adhesive, or pressure directly on the glass panel | A strong option for larger cable bundles and hidden power accessories |
| Freestanding floor cable cover | Hiding cables that must travel from the table to a wall outlet or floor connection | Approximately 2–5 cables, depending on channel width | 10–20 minutes | Excellent | No contact with the glass tabletop is required | None on the table; choose a low-profile, high-visibility design to reduce trip risk | Best for cables leaving the table area and crossing walkways |
| Removable cable sleeve or braided wrap | Bundling several loose cables between the center of the table and a concealed exit point | Approximately 4–8 cables, depending on sleeve diameter | 5–15 minutes | Excellent | No direct load or adhesive contact on the glass | None on the tabletop; keep the sleeve away from sharp table edges | A simple way to make multiple cables look organized without attaching anything to the glass |
| Permanent adhesive raceway | Long-term cable routing where future changes are unlikely | Approximately 3–8 cables, depending on raceway size | 20–40 minutes | Limited | Potentially safe only if the raceway is mounted to a suitable non-glass surface | Adhesive removal can leave residue, pull coatings, or create stress during removal | Use only on compatible table frames or undersides after checking the surface instructions |
| Drilling a cable grommet hole through the glass | Permanent cable routing through the tabletop | Depends on the drilled opening | Professional installation required | Poor | High risk of cracking, breakage, or thermal and mechanical stress | Permanent alteration and possible structural damage | Avoid for reversible cable management; use edge routing, under-table storage, or floor covers instead |
How to Hide Cables on a Glass Conference Table?
Plan Cable Routes and Equipment Placement
Cable concealment starts before the glass table enters the room. Microsoft’s 2023 Work Trend Index found that 73% of employees wanted flexible work options, while 67% still valued in-person collaboration. Meeting rooms therefore need reliable connections and clean access points. Map every signal, power, and control cable first. Place the display, camera, speakers, and power distribution near their natural users. Avoid routing everything toward one corner.
Measure twice.
Keep high-use connections within easy reach of seated participants. A small tabletop access module can serve laptops without crossing the table surface. Route permanent cables through the table legs or a nearby floor box. Use soft, lined channels beneath the glass edge, not adhesive clips that may leave residue. Leave a modest service loop near each device. Technicians will appreciate it later.
AVIXA’s 2024 Industry Outlook and Trends Analysis reported continued growth in professional audiovisual demand, driven partly by collaboration spaces. That growth makes installation quality more important, not less. Separate power cables from sensitive signal lines when possible. Label both ends, photograph hidden routes, and test every connection before closing the pathway. My own practical mistake was placing the floor box too far from the table center. The cable worked, but the walking path did not. Good planning should consider people, not only equipment.
Plan cable routes and equipment placement to keep visible cable runs short. The example compares estimated cable lengths for a typical conference-room layout; measure your own room before installation.
A clear tabletop makes loose cables easy to notice, especially against a bright floor. Install a cable tray beneath the table, attached to its metal frame or approved support points. Do not drill into or clamp directly onto glass unless the table manufacturer permits it. Measure the frame and the distance to nearby outlets before choosing a tray. A narrow tray can hold power strips and excess cable without showing from seated eye level.
Group cables by destination, then secure them with reusable hook-and-loop ties. Leave a little slack near adjustable screens or laptop connections, so plugs are not tugged when equipment moves. Route cords down one table leg inside a discreet sleeve. Keep power and data cables separated where practical, and avoid filling the tray so tightly that cables bend sharply. Some tables have limited clearance; the neatest setup may still need a visible drop near the outlet.
After routing cables beneath a glass conference table, test the setup before the room fills. Connect each device and check that power and data leads reach their ports without pulling tight. Raise and lower adjustable tables through their full range, watching for pinched loops or cables catching on the frame. A small snag now is easier to fix than a dropped connection during a meeting.
Secure cables to the underside of the frame with removable clips, leaving a little slack near plugs. Keep floor crossings out of walking paths where possible, and use a low-profile cover when a crossing cannot be avoided. The U.S. Bureau of Labor Statistics reported 865 fatal workplace injuries from falls, slips, and trips in 2022; that figure is not specific to cables, but it underscores why clear walkways matter. Check the route again after chairs move.
Maintenance is easy to neglect. Put it on the room’s regular inspection schedule. Look for loose clips, cracked insulation, warm adapters, and dust around power connections. Replace damaged leads rather than wrapping them and hoping for the best. Glass shows every stray wire, and neatness can tempt people to bundle too tightly. Leave airflow around power supplies, label both ends of shared cables, and retest after any equipment change. Keep a brief record of what was checked and when; it helps reveal recurring snags.
Use removable clips, a soft sleeve, or an under-table tray. Avoid drilling, permanent glue, and pressure on the glass.
Route them along the rear edge, beneath the table, or through a nearby floor box. Keep walking paths clear.
Use a low-profile floor cover with beveled edges. Choose enough internal space for the cables without crushing them.
Yes, when practical. Separation reduces tangles and makes connection problems easier to trace.
Group cables by destination and secure them with reusable hook-and-loop ties. Leave slack near laptops, screens, and adjustable equipment.
A small loop prevents tension on plugs and connectors. Tight cables can shift equipment or pull connections loose.
Attach trays only to approved metal frames or support points. If no safe mounting point exists, use a freestanding cable basket.
Sit in every chair and inspect sightlines, knee space, and walking routes. Move chairs and screens, then check for snags.
No. A visible, loose section may be safer than a strained or unstable attachment. Neatness can mislead.
Do not place a floor box too far from the table. The cable may work, but people could trip while walking around it.
How to hide cables on a glass conference table starts with assessing the table’s structure, available space, and the types of cables and equipment that need to be connected. Because glass surfaces can be delicate, choose a safe, reversible method that avoids drilling or placing excessive pressure on the tabletop. Plan cable routes and equipment positions in advance so connections remain accessible while cords stay out of sight as much as possible.
Install suitable cable-management components beneath the table, arranging cords neatly and keeping them clear of moving parts and walkways. Once everything is in place, test each connection and check that cables are secure without being stretched or pinched. Regularly inspect the setup and adjust it when equipment or meeting-room needs change.
Correo Office